 My best friend L, like me, loves tea. So I was surprised when she told me that she didn't know how to make iced tea. I tried to explain how I do it, but she found it too confusing. Hence this blog post!
Sometime last year, I decided to give up soda. I've been drinking diet soda daily since childhood. Considering the possible side effects of all those sugar substitutes ... well, it just seemed like a good choice for me. But I love having something flavored with meals, so what could I drink? The huge stash of tea in my pantry gave me a really good idea: instead of only making iced tea in the summer, I could make it year-round! I make a couple pitchers a week, and it's made giving up soda eminently more palatable!
Here's my method:

1. Get everything in place. You'll need:
- a way to boil water (I love the Adagio utiliTEA Electric Kettle; more about that later!)
- Tea (either loose or in bags)
- a way to steep loose tea (if using; I prefer t-sac's size 2 filters)
- a container to brew your tea; I find a metal bowl works well, but you can use anything that is safe from heat shock)
- a bamboo skewer
- sweetener (if desired)
- a spoon
- a pitcher (I use Sterilite's Gallon Pitcher, which stains badly, as you can see. Any pitcher that is safe from heat shock should work fine)
2. Ready Your Pitcher
 Take the lid off and lay it aside (we'll use it later as a tea bag rest). Add sweetener to your pitcher, if desired. Add enough to sweeten a gallon of tea (or the amount your pitcher holds). Keep in mind that any granulated or thick sweetener will dissolve better in hot tea, so if you add it now, you'll have perfectly sweetened tea by the time it cools. I use a combination of agave nectar and vanilla-flavored liquid stevia. I can add more stevia later if needed, as it dissolves easily in cold liquid. One of the best things, to me, about making your own iced tea is that you can use healthier sweetening options!
3. Prepare the Tea
There are two different options I use: loose tea and tea bags. I'll illustrate how I use each.

First, loose tea:
As I mentioned before, I like to use t-sac's size 2 tea filters. You could use a tea diffuser or other method; just make sure whatever you use allows you to include enough tea for about 8-10 cups (with room for expansion). A general rule of thumb is one teaspoon of tea per cup, with an extra one "for the pot." Some methods for making iced tea have you brew very strong tea, then dilute it with cold water or ice. I find that brewing several pots with the same tea allows me to make a mellow iced version that isn't watered down. In order to accomplish that, you need to use high-quality tea. It doesn't have to be expensive, but you don't want to use generic orange pekoe tea bags from the grocery store. A great source for inexpensive quality tea is your local TJ Maxx, Ross, Home Goods, or other stores of that type. There are, of course, local specialty stores, and even really expensive options like Teavana (which does have amazing tea that can be brewed repeatedly, if your pocketbook can stand the cost...).

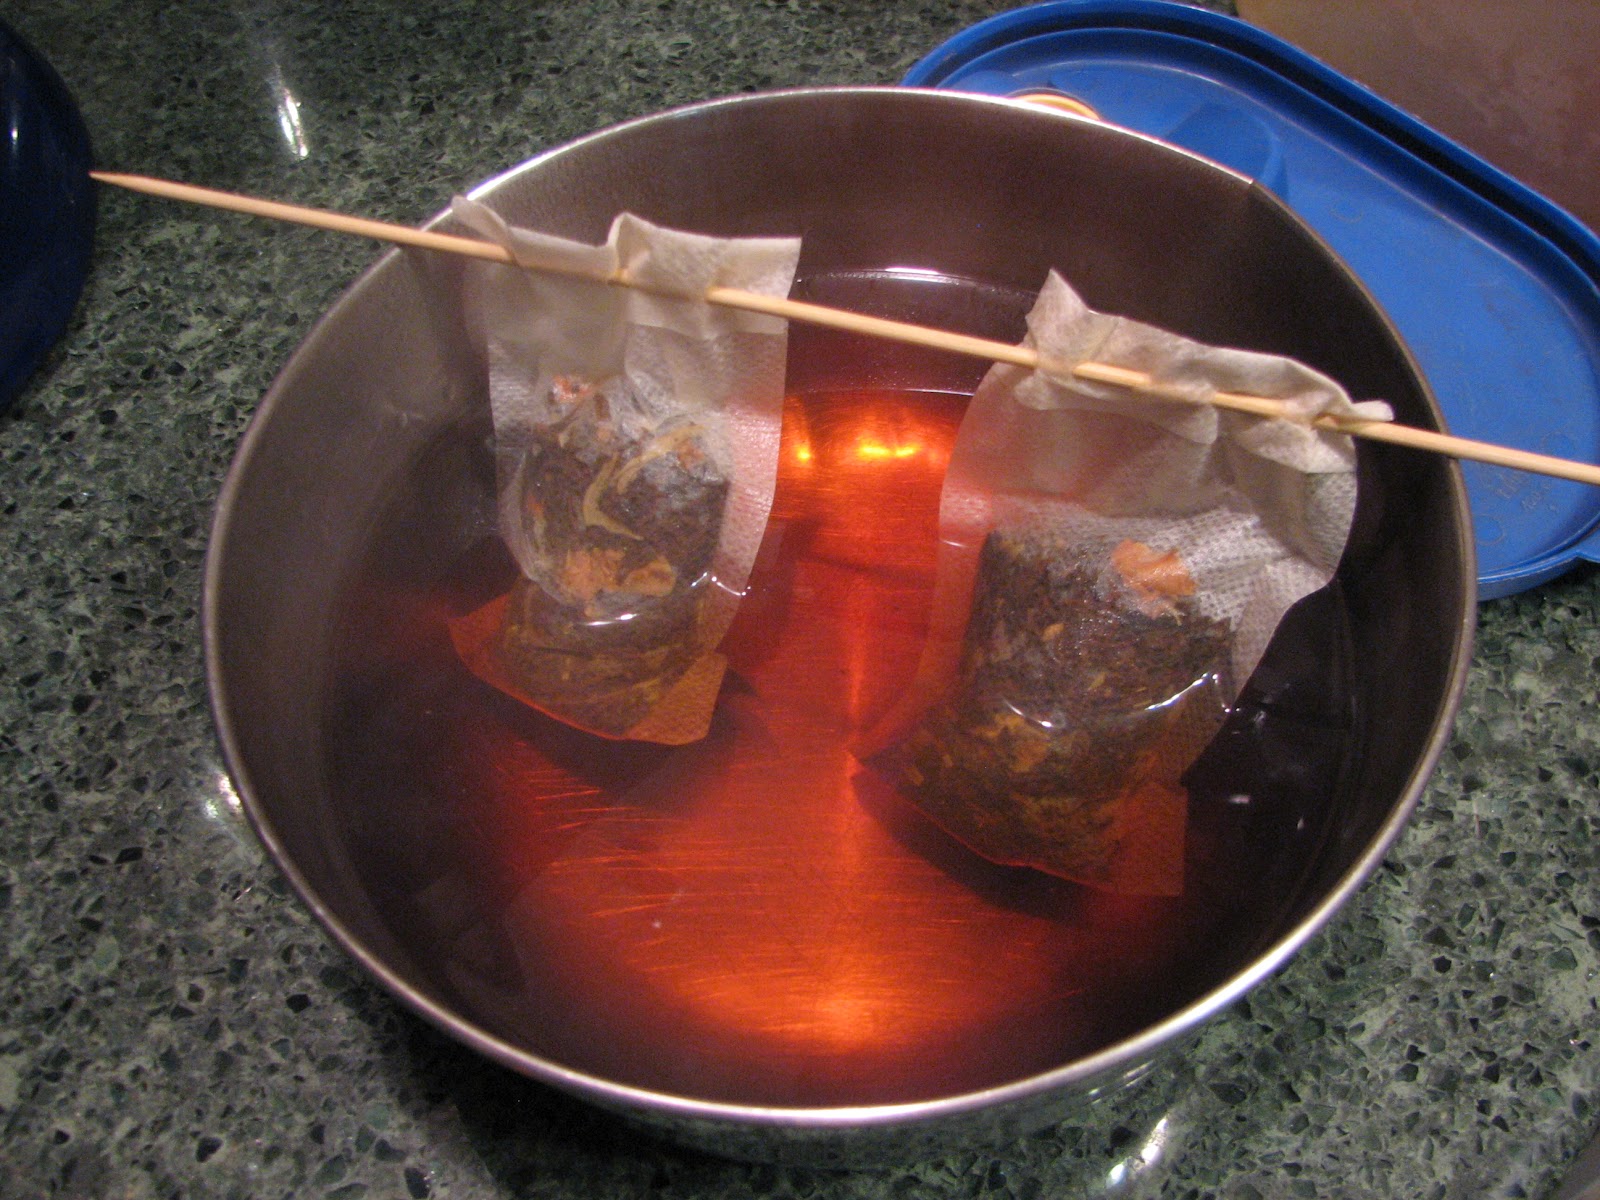
Use the spoon to add tea to your chosen receptacle. I usually fill the t-sac bags about halfway, shaking them down to make sure the tea fills the bottom completely. The bag on the left is full.

If using the t-sacs, fold the top down two times (see bag on left in the photo), then thread the bamboo skewer through the top. See below for a close up of this method.
 |
| How to thread the skewer through the t-sac: weave it in back and forth. |

Once you've threaded the two t-sacs on your skewer, rest it across your receptacle. Make sure whatever you use is safe to receive very hot water without suffering from thermal shock, and that your tea will be immersed in the water when you fill the receptacle. I use this metal mixing bowl that was damaged: the bend in the rim makes a kind of "spout," which I really like.
Or, Use Tea Bags:
I find that four normal tea bags is enough to make a gallon of iced tea. Here's what I do to use them: using the paper tab at the end of the string, I tie the tea bags to my bamboo skewer. I basically just make the beginning of a knot: the tab keeps them from falling off.
Step One: bring tab over the skewer so it hangs off the back.

Step Two: tuck the tab through the circle made just below the skewer.

Step Three: pull tight.

Do this for all four tea bags on the same skewer, then lay it across your receptacle.

4. Brew Your Water

 As I said before, I adore the Adagio utiliTEA Electric Kettle. It's the best gift I've ever given myself! Although it brews water quickly, can be set down on the base facing any direction, and has a stay-cool handle, what makes it so exceptional is that it has a variable temperature gauge, made just for tea brewing! As you can see in the photo, the gauge goes from low temp (left) to high temp (right), which a special section for green teas (conveniently marked in green) and black tea (marked in brown). I didn't like green tea until I finally made it with this kettle. It's amazing what a difference it makes when tea is made with the right temperature water, and this kettle makes it so easy! Sadly, it's currently back-ordered everywhere. Guess it was just too popular! But keep checking, and hopefully you can get your hands on one sometime soon! Anyways, if you are making green or white tea and have a kettle like this, set it for that temperature. If you're brewing black, turn it all the way to the right (or heat water to boiling). This kettle makes four cups at a time, so that's what I make.
5. Start Making Tea (About Time, Right?)

While your water is brewing, check out the time your tea should brew. Many teas come with this information on the label or jar. If not, consult a guide. I find that the information on the back of Teavana's bags is really useful, so I cut it out and kept it. You can see it below, in case it's helpful for you too! Keep in mind that the guidelines for iced tea on the chart assume you're brewing it all at once. Since we're doing a pot at a time, use the times for hot tea.
 |
| Teavana's tea brewing guide, with water temp and brewing time. |
Using those time guidelines, when the water is ready, pour it over your tea and set a timer. Refill your kettle and set it to heating again while your tea brews. Sometimes the two take the same amount of time (score!), but if that's not the case, make sure you're nearby so your tea doesn't get that bitter tannic acid flavor from overbrewing!
6. Rinse and Repeat (well, just the latter, actually...)

Once your tea has brewed, lift the tea out and place it on the upturned lid. Pour the tea into your prepared pitcher. Then replace the tea in your brewing receptacle, and pour any tea from the lid into the pitcher, too. Repeat this process three times, so you've brewed four kettles (16 cups) of tea, total. You can be less vigilant about the time you brew the tea with your last batch; it will be a weaker brew to begin with. so a little more time won't hurt.
7. You Can Almost Taste The Refreshment!

If, like me, you can't wait for your first glass, just fill a cup with ice and pour the hot brew over it. It'll be a little watery, but still very good. Once the tea has completely cooled, put the lid on and refrigerate. You'll have delicious iced tea for days...if it lasts that long!


